Here is a quick tutorial on how to add a link to a photo in Constant Contact.
There are many reasons to add links to the photos in your Constant Contact mailings:
- To readers back to your website
- To include extra information
- To ‘activate’ button images
- If nothing else, because people will try to CLICK on your photos!
Here is how to add a link to a photo in Constant Contact
Here is how to add a link to a photo in #ConstantContact Share on X1. Log into your account and open the template you will be using.
2. Navigate to the BLOCK where you will add the image and click on the pencil icon to enter EDIT MODE

3. Move your cursor to the spot where you want the image to appear and click on the “IMAGE” tab in the upper left of the sidebar

4. This will take you to your image library where you can pick the image/ photo you want to insert

Note that your Library may have images in the sidebar only, as opposed to the array above – either way, scroll to find the image you want to insert.
OR you can UPLOAD a new photo or image by clicking on the ‘upload file’ button in the upper right hand corner of this pop-up window

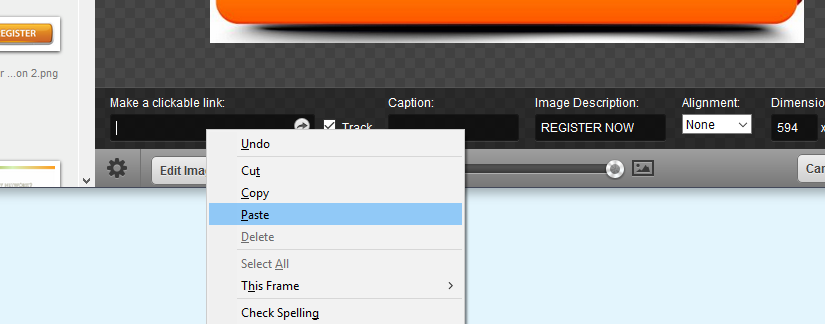
5. Once you have picked the image, click on the image and you will see a new window with a larger version of the image and a series of options and settings at the bottom.
Options include:
- Adding a clickable link (we will use this one)
- Whether we will track the clicks (always leave this ON – the box should appear checked)
- Adding a caption (this will appear as text below the image)
- Adding an image description (this is the text that will appear when the reader rolls over the image – it is always good to add this. You can see in this example that I used REGISTER NOW to encourage people to click on the button to register)
- Setting the alignment (none, left, right or center) If you wanted the image to appear to the RIGHT SIDE of the text in this block, you would set it to RIGHT ALIGNMENT
- Setting the dimensions (this changes the size of the image) You can also use the sliding bar below to change the size and the visual editor, activated by dragging the image, as shown below.
- You can also EDIT the image – cropping and adding a border to the photo – by clicking the ‘edit image’ button.

NOTE: if, for some reason, you DO NOT SEE these options as shown in the image here, try clicking on the small GEAR icon – that should make them appear.
6. Add a LINK – a URL address – to the ‘clickable link’ field – copy and paste it in or type it in from scratch
In this example, I will use the registration landing page URL. I opened the page in a new tab to COPY the address

Then went back to the pop up window and PASTED the address into the ‘clickable link’ box

You may NOT see the entire link as the window is small – you can scroll backwards to check that it is complete

Click the ‘INSERT’ button and the image, with the link, will then appear in the block

You can move the image to another location in the block by dragging it to another cursor location and you can RE-size the image by clicking on it, while still in edit mode, and dragging any corner of the image. You will see the size change, visually and in numbers

If you have the newest CC interface, you may have the ability to DRAG and DROP images from your library (which will appear in your sidebar). In that case, drag the photo into the correct spot, enter edit mode to see the options listed above add the link to the field as noted.
If you need further help with how to add a link to a photo in Constant Contact or with any aspect of your email marketing, please give me a call at 212.664.1872 – I would love to help you make the most of your mailings!

